![]()
 These instructions are presented here for informational purposes
only. Any modifications you choose to do to your gun, you do so at your
own risk. Be sure to REMOVE the CO2 or other gas source from any paintball
marker before you attempt disassembly. Wear eye protection when using ANY
power tools. If unsure about safely modifying your gun, consult a professional
airsmith. Remember, safety must ALWAYS come first! These instructions are presented here for informational purposes
only. Any modifications you choose to do to your gun, you do so at your
own risk. Be sure to REMOVE the CO2 or other gas source from any paintball
marker before you attempt disassembly. Wear eye protection when using ANY
power tools. If unsure about safely modifying your gun, consult a professional
airsmith. Remember, safety must ALWAYS come first! |
![]()
Submitted by Chris (aka Sugar Ray)
Trigger Job

 Ok, after performing the sear
modification as listed in Sid's Stingray FAQs and Quake's Ultimate Trigger Job, and adjusting it, the sear
should release with a fairly snappy pull. The forward trigger throw is also
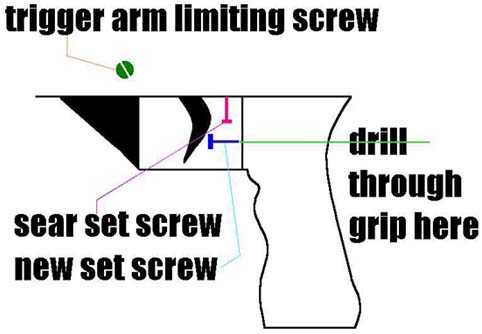
fairly easily adjusted by placing a bolt across the trigger arm. But, I
was still not satisfied with the total trigger travel on my Ray. I wanted
to get another set screw between the back of the trigger and the front ot
the grip. This screw would act as a direct block for rearward trigger travel.
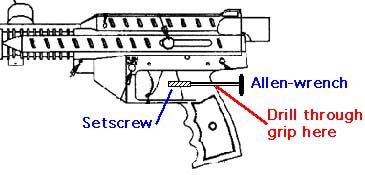
There were two problems though, how to drill a hole in the grip frame behind
the trigger and how to access the sear adjusting screw with the new set
screw crossing its path.
Ok, after performing the sear
modification as listed in Sid's Stingray FAQs and Quake's Ultimate Trigger Job, and adjusting it, the sear
should release with a fairly snappy pull. The forward trigger throw is also
fairly easily adjusted by placing a bolt across the trigger arm. But, I
was still not satisfied with the total trigger travel on my Ray. I wanted
to get another set screw between the back of the trigger and the front ot
the grip. This screw would act as a direct block for rearward trigger travel.
There were two problems though, how to drill a hole in the grip frame behind
the trigger and how to access the sear adjusting screw with the new set
screw crossing its path.
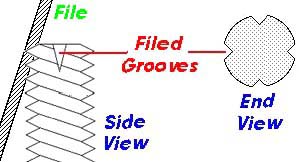
With my mind a-whirring, I had an idea, I grabbed my drill and punched a small pilot hole through the back of my grip, directly behind the trigger. I drilled all the way through to the front of the grip, coming out just behind the trigger. Next, I removed the trigger. I used a small allen wrench and hammer to lightly tap out the pin. Once I got the trigger and trigger spring out, I removed the safety. It was non-functioning after the mods anyway. I picked a 6-32 x 1 1/2 " allen head machine screw. The hole needed a bit of widening and the screw was a little hard to get started from this angle, but it finally took. By using the short side of an allen wrench and pressing very hard, the set screw finally bit. I screwed it in farther than needed. I put the trigger back in and tested it. It shortened the trigger throw, but needed adjustment. I pulled the trigger back to the point where it released the sear (pull the cocking bolt back, pull the trigger to just the point where the gun fires) and noted the position.
|
Adjusting this bad boy is not much fun, but the results are worth it. So, I took the trigger back off and unturned the set screw a few more turns. After doing this two more times, the trigger pull is down to about 1/8". This is the actual, physical distance the trigger can travel. The set screw is very sturdy.
After installing the screw, I have another idea so both it and the set screw can be adjusted, independently with the trigger in place. Instead of machine screws or allen headed machine screws, use machine screws with regular bolt heads. A small wrench could be used to adjust both the screws if needed. This would be slow, but not as slow as taking the trigger out of the grip frame. This idea I haven't tried yet. If someone has the time, let me know how it works out.
|
![]()

 © Stingray Toters Internet Group