

 These instructions are presented here for informational purposes
only. Any modifications you choose to do to your gun, you do so at your
own risk. Be sure to REMOVE the CO2 or other gas source from any paintball
marker before you attempt disassembly. Wear eye protection when using ANY
power tools. If unsure about safely modifying your gun, consult a professional
airsmith. Remember, safety must ALWAYS come first! These instructions are presented here for informational purposes
only. Any modifications you choose to do to your gun, you do so at your
own risk. Be sure to REMOVE the CO2 or other gas source from any paintball
marker before you attempt disassembly. Wear eye protection when using ANY
power tools. If unsure about safely modifying your gun, consult a professional
airsmith. Remember, safety must ALWAYS come first! |
![]()
Tom's Custom Foregrip
Submitted by Tom Holder
 I got the idea for the
foregrip from e-mail conversations with Sid. He was advocating the PVC
pipe grip - I liked the idea but wanted it to look a little more "finished".
I got the idea for the
foregrip from e-mail conversations with Sid. He was advocating the PVC
pipe grip - I liked the idea but wanted it to look a little more "finished".
All you need is a new handgrip (#136935, $4 from Brass Eagle), a hacksaw, a Dremel (or a file), and some epoxy (I use Lepages - comes in a syringe that automatically mixes the two agents). The inner curve of the handgrip matches the outer curve of the barrel shroud just about exactly. So all you have to do is cut the handgrip to length with the hacksaw (I made it the same length as the entire barrel "socket" portion of the main shroud - about 3") and cut off the trigger guard. I cut the front of the handgrip at a 45 degree angle to match the angle at the front of the rear handgrip (God lives in the details!). I sanded down the remainder of the trigger guard until it became like one of the bumps between the finger grooves.
The only time-consuming part is sanding down the protrusions on the inside of the handgrip where all the trigger hardware used to connect. You have to do some grinding (or filing) to match the two curves cleanly. The only tough choice you have to make is whether you want to grind U-shaped slots in the handgrip where the barrel pin comes through the barrel "socket" to allow it to function normally (which I advocate) or to try and match up some holes in the handgrip for the pin to go through (a friend of mine did this after briefly seeing my 'Ray. He assumed that it was what I had done. It was a lot more work but looked a little more "factory". I don't think it's worth the effort personally.)
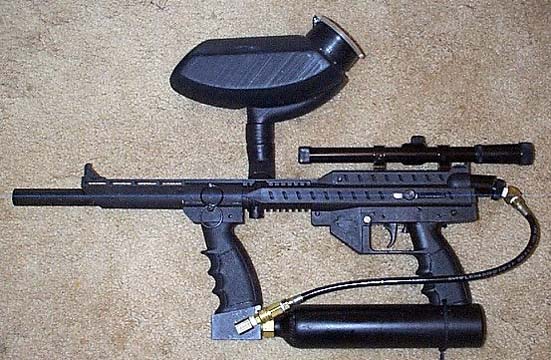
Once you have the pieces fitted so that it looks good and the barrel can be installed normally (check this first!!!), roughen both pieces with some coarse sandpaper. They should look dull and grainy. Wash it well to get rid of any loose material, and let it dry. Then coat the pieces with epoxy and let it cure the full 24 hours (or whatever your epoxy calls for. Don't dink with it until it's dry ! ! ! It's hard for me too but it's worth it to wait.). I put the one in the picture together last year about this time and it is still on the gun AND supporting the tank.
Please note, if you are going to set your gun up like the one in my photo, I have tied the tank to the rear handgrip by drilling a couple of holes and putting a plastic tie-wrap around the tank. This spreads the load of the tank a bit more and I just replace the tie-wrap after every fill.
One thing I was considering doing if I had the time was to make another shroud with the front handgrip coming off the left side horizontally - it struck my that this would be the most comfortable method of "shooting from the hip". I had this image of Jesse the Body Ventura in Predator with his rotary cannon. I know it's a stretch but we have long winters up here.
![]()

![]() © Stingray Toters Internet
Group
© Stingray Toters Internet
Group